How to add a data cable to your MFJ-1275M for your Yaesu data-port
 The MFJ-1275M soundcard interface will work fine with your Yaesu rig, using the cables
supplied with the MFJ-1275M.
The MFJ-1275M soundcard interface will work fine with your Yaesu rig, using the cables
supplied with the MFJ-1275M.
But some things were bothering me: the long AUDIO cable from the rig to the interface, the fact that you'll have to plug your mike into the
interface and especially that the whole configuration won't work anymore when you plug your headphone in (the interface is using the external speaker
connector).
The solution for this is, to use the data connector of your Yaesu rig (like my FT-897D). This data connector can handle the PTT switch and RX/TX
data. The RX-data from your rig is also at a fixed level, which is quite nice because you won't have to adjust your volume level anymore when you
switch between bands. Also, the RX audio output from the data connector is not being cut off when you plug your headphone in.
How? Well, first of all, don't run to the shop to buy yourself a MFJ-1275. There's nothing wrong with it, on the contrary, but this mod is only
usefull when you already have such an interface. When you plan to make your own interface, you can attach a data cable to it directly. When you
already have another interface, it is not smart to buy this MFJ and to mod it as soon as you come home, leaving the first interface close to the
garbage can.
It's actually quite simple. First of all, you will need a data cable. You can buy the Yaesu CT-39A interface cable, or, a little cheaper, you can
buy a PS/2 extension cable. Why an extension cable? Because generally spoken, has all the pins in use. You can also cut the cable from a PS/2 mouse, but
possibly you will be a wire short.
You will need pins 1-5 and the surrounding GND. Here's an explanation of these pins, including the colors of the CT-39A cable:
|
| Data jack pin # | Function | Wire color |
|---|
| 1 | Data input (TX Audio) | Brown |
| 2 | Data GND | Red |
| 3 | PTT | Orange |
| 4 | RX data (9600 bps) | Yellow |
| 5 | RX data (1200 bps) | Green |
Pin 6 is the squelch status, you don't need it here. Furthermore, when you shorten the CT-39A to make it fit better to your rig (and to reduce the
possibility of interference) you'll see that there are 2 more wires in it. You won't need them either, it's just an unexpected surprise from Yaesu.
You also need the GND which is wrapped around the wires, you won't see it when you open the CT-39A package but when you cut a piece of the isolation
away you'll see it. Remember: mic or data ground IS NOT THE SAME AS common ground!
Let's solder!
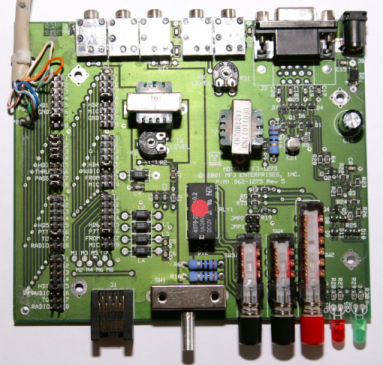
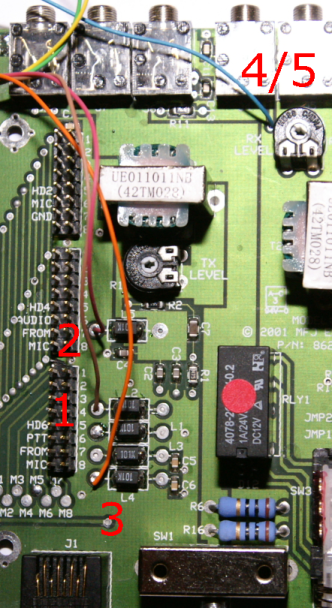 The jumpers are working like a network. When you look at them from above, front facing, the right rows of the jumpers are all connected
to each other. You need to solder above mentioned pins to a line to these rows. You can see on the pictures where you can fins a nice place to
attach the wiring.
The jumpers are working like a network. When you look at them from above, front facing, the right rows of the jumpers are all connected
to each other. You need to solder above mentioned pins to a line to these rows. You can see on the pictures where you can fins a nice place to
attach the wiring.
Pin 1 (brown) to jumper HD4
Pin 2 (red) to jumper HD2
Pin 3 (orange) to jumper HD5
That was easy. Now, we have to decide something. All audio from your Yaesu rig (at fixed level) comes over pin 5 (green, 1200 bps). For packet however,
some Yaesu's are able to switch between 1200 and 9600 bps. If you don't care about packet, solder pin 5 (green) to the audio input of the MFJ-1275M. But
if you want to use the packet feature of your Yaesu, make a switch for pin 4 (yellow, 9600 bps) and pin 5 (green, 1200 bps + rig audio) and connect the
switch to the audio input of the MFJ-1275M. Actually, i don't care for packet, but since i was already busy soldering i decided to add the switch
anyway.
You can find a good spot for the RX data lines at the picture.
The last you'll have to do is to solder the GND to the interface. At the spot where the modular cable comes into the interface, there's a nice place to
solder it. It also provides some toughness to protect the cable. You can see it on the picture. You could also solder it somewhere else like near
jumper HD1.
Finally, since the output level on your Yaesu is fixed, adjust the RX input level on the MFJ-1275M. In my case that meant that i had to turn the
potentiometer completely clockwise to a 100%, but that could be different on your configuration.
The nice thing about this mod is that we don't destroy any possibility of the MFJ-1275M. You just add one. You can use the MFJ-1275M with the
data cable WITHOUT any jumper setting. Or, you can set the jumpers for another rig, and use the cables supplied with your MFJ-1275M to connect
your interface to it. When you want to connect your Yaesu rig again, just pull all the cables to your Kenwood rig out and put the data cable in your
Yaesu. All with no jumper setting to be changed! WARNING: DO NOT CONNECT BOTH RIGS AT THE SAME TIME!!)

You could remove the modular cable if you think you won't need it ever again. I didn't, i just rolled it up and put it in the interface, for
future use. I did cut off a large piece of the CT-39A cable, because i won't need it and the only thing it could cause is interference. I only needed
25 cm of it.
I cannot be held responsible for any damage caused by this mod.
73, Jeroen pd0j